Integration page structure
This page shows the recommended structure of an integration page and useful reusable text.
This page outlines the high-level structure of an integration page. Use this structure together with the following documentation:
- Documentation standards.
- Documentation style guide.
- The documentation rules of the Integration Quality Scale.
Basic structure of an integration page
For a template that you can copy and paste, see the integration documentation template in the home-assistant.io repository: /_integrations/_integration_docs_template.markdown.
Integration pages follow this structure:
- Introduction
- Use case
- Supported/unsupported devices
- Prerequisites
- Configuration
- Configuration options
- Supported functionality
- List of triggers
- List of conditions
- List of actions
- Examples
- Data updates
- Known limitations
- Troubleshooting
- Community notes
- Removing the integration
Documenting automation triggers, conditions, and actions
When you document an integration, create a separate file for each of its triggers, conditions, and actions. Then include them in the main integration page with:
{% include integrations/triggers.md %}
{% include integrations/conditions.md %}
{% include integrations/actions.md %}
If the integration has all three components (trigger, condition, and action), you can use the combined template:
{% include integrations/triggers_conditions_actions.md %}
Template: trigger
Create a file in the home-assistant.io repository in source/_triggers.
Save it as <my_integration>.<trigger_name>.markdown, for example: light.brightness_changed.markdown.
Adapt this template for your integration:
---
title: "Light brightness changed"
trigger: light.brightness_changed
domain: light
description: "Triggers after the brightness of one or more lights changes."
related_triggers:
  - light.brightness_crossed_threshold
  - light.turned_on
---

The **Light brightness changed** trigger fires after...
Use it to...

{% include triggers/ui_header.md %}

To use this trigger in an automation:

1. Go to {% my automations title="**Settings** > **Automations & scenes**" %}.
2. Open an existing automation, or select **Create automation** > **Create new automation**.
3. In the **When** section, select **Add trigger**.
4. From the search box, search for and select **Light: Light brightness changed**.
5. Select what you want to monitor. Under **By target** (see [Targets](#targets)), pick... You can also select a floor, a device, a specific entity, or a label.
6. From the triggers shown for that target, select...
7. Under **Trigger when** (see [Behavior](#behavior-with-multiple-targets)), pick **Any**, **First**, or **Last** to control how multiple targets interact.
8. Under **Threshold type**, set how much the level has to change before the trigger fires.
9. Under **Another field**, set...
10. Select **Save**.

### Options in the UI

<!-- Note that there are no "required" or "type" fields for UI options, as you have in YAML. They are not rendered for the UI options. -->

{% options_ui %}
Threshold type:
  description: How much the brightness has to change before the trigger fires, as a percentage of full brightness. Can be a fixed number, or reference a helper entity that provides the value.
{% endoptions_ui %}

{% include triggers/yaml_header.md %}

In YAML, refer to this trigger as `light.brightness_changed`. A basic example looks like this:

{% example %}
trigger: |
  trigger: light.brightness_changed
  target:
    entity_id: light.living_room
  options:
    threshold: 10
behavior:
  description: >
    When multiple sensors are targeted, controls when the trigger fires. Accepts `any`, `first`, or `last`.
  required: false
  type: string
  default: any
{% endexample %}

This fires whenever the living room light's brightness changes by at least ten percent.

### Options in YAML

YAML sometimes provides additional options for more complex use cases that are not available through the UI.

<!-- If the option has a default value, set the required field to false. -->

{% options_yaml %}
threshold:
  description: >
    The minimum amount (in percent) the brightness must change before the trigger fires. Accepts a number, or a reference to an `input_number`, `number`, or `sensor` entity with a percent unit.
  required: true
  type: any
{% endoptions_yaml %}

<!-- Keep the "include" below if your integration supports targets -->
{% include triggers/targets.md %}

{% include triggers/behavior.md %}

## Good to know

- Add extra information here.

{% include triggers/try_it.md %}

{% include triggers/more_examples.md %}

### Automation: sync a ceiling fan speed to the ceiling light

When you dim the ceiling light down, slow the fan down too. A classic "scene mood" automation that keeps the room coordinated.

- **Trigger**: Light brightness changed
  - **Target**: Living room ceiling light
  - **Threshold type**: 10
- **Action**: Fan: Set speed

{% details "YAML example for a ceiling-light-linked fan" %}

{% example %}
automation: |
  alias: "Match fan to ceiling light"
  triggers:
    - trigger: light.brightness_changed
      target:
        entity_id: light.living_room_ceiling
      options:
        threshold: 10
  actions:
    - action: fan.set_percentage
      target:
        entity_id: fan.living_room
      data:
        percentage: "{{ state_attr('light.living_room_ceiling', 'brightness_pct') | int }}"
{% endexample %}

{% enddetails %}

{% include triggers/stuck.md %}

{% include triggers/related.md %}
Template: condition
Create a file in the home-assistant.io repository in source/_conditions.
Save it as <my_integration>.<condition_name>.markdown, for example: light.is_on.markdown.
Adapt this template for your integration:
---
title: "Light is on"
condition: light.is_on
domain: light
description: "Tests if one or more lights are on."
related_conditions:
  - light.is_off
  - light.is_brightness
---

The **Light is on** condition passes when...
Use it to...

{% include conditions/ui_header.md %}

To use this condition in an automation:

1. Go to {% my automations title="**Settings** > **Automations & scenes**" %}.
2. Open an existing automation, or select **Create automation** > **Create new automation**.
3. In the **And if** section, select **Add condition**.
4. From the search box, search for and select **Light: Light is on**.
5. Select what you want to check. Under **By target** (see [Targets](#targets)), pick the area your ... is in (like your living room or bedroom).
   You can also select a floor, a device, a specific entity, or a label.
6. Under **Condition passes if** (see [Behavior](#behavior-with-multiple-targets)), pick **Any** or **All**.
7. Select **Save**.

### Options in the UI

{% options_ui %}
Condition passes if:
  description: When multiple lights are targeted, controls how results combine. Pick **Any** to pass if at least one targeted light is on, or **All** to pass only when every targeted light is on.
{% endoptions_ui %}

{% include conditions/yaml_header.md %}

In YAML, refer to this condition as `light.is_on`. A basic example looks like this:

{% example %}
condition: |
  condition: light.is_on
  target:
    entity_id: light.living_room
{% endexample %}

This passes when the living room light is currently on.

### Options in YAML

YAML sometimes provides additional options for more complex use cases that are not available through the UI.

{% options_yaml %}
behavior:
  description: >
    When multiple lights are targeted, controls how results combine. Accepts `all` or `any`.
  required: false
  type: string
  default: any
{% endoptions_yaml %}

<!-- Keep the two "includes" below if your integration supports targets -->
{% include conditions/targets.md %}

{% include conditions/behavior.md %}

## Good to know

- Add extra information here.

{% include conditions/try_it.md %}

{% include conditions/more_examples.md %}

### Automation: only announce the doorbell if the living room is lit

When the doorbell rings, only announce it through the living room speaker if the living room light is already on. Keeps the house quiet when the room is empty.

- **Trigger**: State: Doorbell button pressed
- **Condition**: Light is on
  - **Target**: Living room light
  - **Condition passes if**: Any
- **Action**: Media player: Play media

{% details "YAML example for a doorbell announcement gated on lights" %}

{% example %}
automation: |
  alias: "Doorbell announce when living room lit"
  triggers:
    - trigger: state
      entity_id: binary_sensor.doorbell
      to: "on"
  conditions:
    - condition: light.is_on
      target:
        entity_id: light.living_room
      options:
        behavior: any
  actions:
    - action: media_player.play_media
      target:
        entity_id: media_player.living_room
      data:
        media_content_id: "media-source://tts/cloud?message=Someone+is+at+the+door"
        media_content_type: music
        announce: true
{% endexample %}

{% enddetails %}

{% include conditions/stuck.md %}

{% include conditions/related.md %}
Template: action
Create a file in the home-assistant.io repository in source/_actions.
Save it as <my_integration>.<action_name>.markdown, for example: light.turn_on.markdown.
Adapt this template for your integration:
---
title: "Turn on a light"
action: light.turn_on
domain: light
description: "Turn a light on. Optionally set brightness, color, color temperature, an effect, or a transition."
since: "0.7"
related_actions:
  - light.turn_off
  - light.toggle
---

The **Turn on a light** action turns a light on...
This action works with any light {% term entity %} in Home Assistant...
If the light is already on, calling the action...

{% include actions/ui_header.md %}

To turn a light on from an automation or a script:

1. Go to {% my automations title="**Settings** > **Automations & scenes**" %}.
2. Open an existing automation or script, or select **Create automation** > **Create new automation**.
3. If you're setting up a new automation, add a trigger in the **When** section. Scripts don't need a trigger. They run when something else calls them.
4. In the **Then do** section, select **Add action**.
5. From the search box, search for and select **Light: Turn on**.
6. Select what you want to control. Under **By target** (see [Targets](#targets)), pick the area your ... is in (like your hallway or entryway). You can also select a floor, a device, a specific entity, or a label.
7. Select **Save**.

### Options in the UI

{% options_ui %}
Transition:
  description: How long, in seconds, it takes to get to the next state. Use this for a smooth fade instead of switching instantly.
{% endoptions_ui %}

{% include actions/yaml_header.md %}

In YAML, refer to this action as `light.turn_on`. A basic example looks like this:

{% example %}
action: |
  action: light.turn_on
  target:
    entity_id: light.kitchen
{% endexample %}

This turns on `light.kitchen` at its previous brightness and color.

### Options in YAML

YAML sometimes provides additional options for more complex use cases that are not available through the UI.

{% options_yaml %}
transition:
  description: >
    Duration, in seconds, it takes to get to the next state. Use this to fade smoothly instead of switching instantly.
  required: false
  type: integer
{% endoptions_yaml %}

{% include actions/targets.md %}

## Good to know

- Add extra information here.

{% include actions/try_it.md %}

{% include actions/more_examples.md %}

### Automation: set a cozy warm white tone

When you start winding down in the evening, dim the kitchen light to a warm white tone.

- **Action**: Light: Turn on
  - **Target**: Kitchen light
  - **Brightness percentage**: 80
- **Color**: warm_white

{% details "YAML example for a cozy warm white scene" %}

{% example %}
action: |
  action: light.turn_on
  target:
    entity_id: light.kitchen
  data:
    brightness_pct: 80
    color_name: warm_white
{% endexample %}

{% enddetails %}

{% include actions/stuck.md %}

{% include actions/related.md %}
Reusable text for integrations
You can reuse text that's repeated across many pages.
The following snippets are useful for integration pages.
Configuration
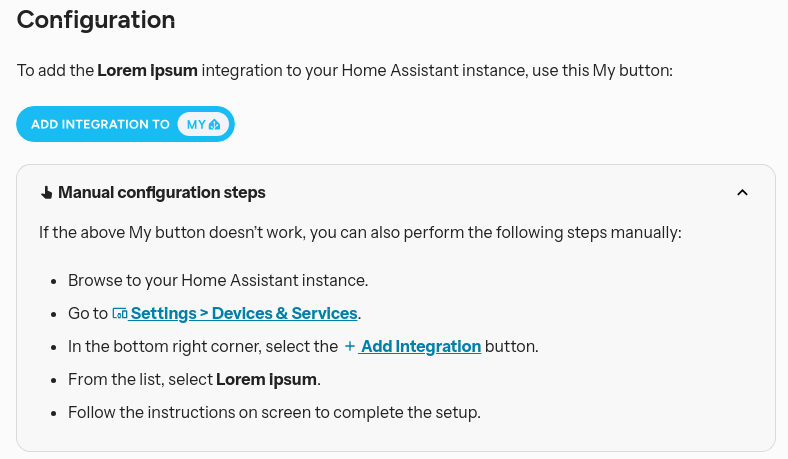
Screenshot showing the predefined configuration text block
To use this element, add the following line:
{% include integrations/config_flow.md %}
For the current snippet contents, see config_flow.md.
Configuration_basic block
Use the configuration_basic block to describe configuration options if your integration is set up through a config flow.
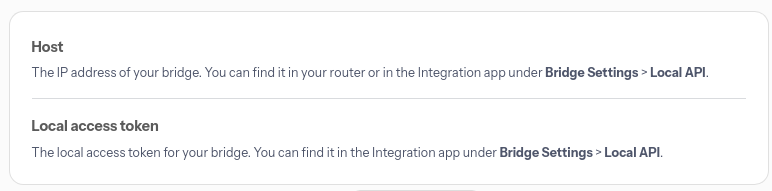
Screenshot showing a configuration variable block for integrations that are set up in the UI
{% configuration_basic %}
Host:
    description: "The IP address of your bridge. You can find it in your router or in the Integration app under **Bridge Settings** > **Local API**."
Local access token:
    description: "The local access token for your bridge. You can find it in the Integration app under **Bridge Settings** > **Local API**."
{% endconfiguration_basic %}
Configuration block for YAML integrations
Use the configuration block to describe configuration options if your integration is set up via YAML only.
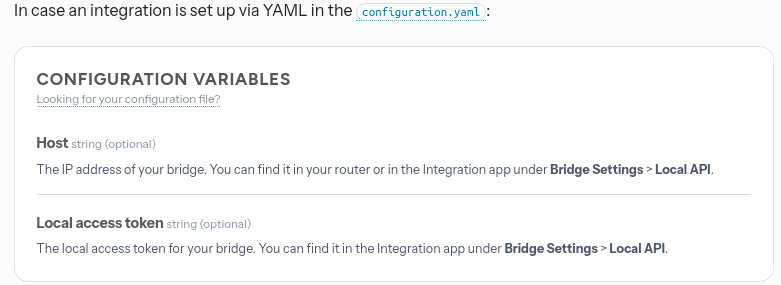
Screenshot showing a configuration variable block for YAML integrations
{% configuration %}
Host:
    description: "The IP address of your bridge. You can find it in your router or in the Integration app under **Bridge Settings** > **Local API**."
    required: false
    type: string
Local access token:
    description: "The local access token for your bridge. You can find it in the Integration app under **Bridge Settings** > **Local API**."
    required: false
    type: string
{% endconfiguration %}